
Year 1
Jack Petrie
Production
Asset Progress:
Knife Asset:


This is the process of my First Asset. The left Image is of the plain model. It was a nice and relaxed re-entry into 3DS Max after my break from it but a lot of the skills have come back to me from last year. This will be the first model that I will have properly textured ever as well so I will be learning new skills as well. The Middle image is the UV Editor which shows all the flattened shapes of the model, now ready to be put into photoshop and have textures applied. The right picture is the final render of the knife asset. I came across a few problems with unwrapping this. For example some of the green outlines where not the right shape that the textures where however all I had to do was relax it and it reverted to the right size and shape. Some of the shapes where also not peeled properly so they were not in the UV Editor. I was also able to quickly fix this as well. After completing this the result is nice, for my first proper unwrap.
Television Asset:


The Following Images are of the production of my second asset, The Television. This will be incorporated into the scene and possibly serve a purpose in the crime itself. The Left image is after I had finished the initial Model. Some of the sides are quite plain but I didn't want it to have to much detail on the sides that no one will really see. I did do a little wire on the back however. On the front I included multiple buttons that are commonly seen on old(-ish) TV's when remote controllers weren't really used. The Screen was probably the biggest struggle as I needed to make it slightly rounded. I used the soft selection tool and also chose a new smoothing group to get it smoother. Both tools were new to me and great to now be able to use. There are also some less noticeable details like a disk drive and a couple speakers on the sides of the screen. These will be enhanced with textures. The Middle image shows a screenshot of the unwrap that is ready for photoshop. This one is quite complex so I need to decide whether to use Photoshop or an easier method. I have decided to only unwrap the main box so I wont have the small buttons or the wire on it as they don't really need texture. The Right image is the completed asset. It has a nice retro look to it and it works. I am pleased with this asset.
Coffee Table Asset:


These images are for the Coffee table Asset. It is the 3rd I have made and maybe the easiest. The legs were quite difficult to work out how to do it but I found a way that looks nice and also kind of resembles its source material. This will be a centre piece in the living room and will have multiple smaller assets on top of it. The Left image is the completed model but it has yet to be textured. This will make it look loads better. The Middle image is of the Unwrap for the model. The Right image is the completed model. When texturing it in photoshop I was was worried that the image of the wood would be too far zoomed in and would not work. However it did. I used a slightly different texture on the legs to give it some variety. The asset looks really realistic and I'm pleased with it.
Spotlight Asset:


This is my 4th asset. It is, pretty much, a direct representation of the spotlight in my Asset Mood Board. It was an ok process and there were a few 'Grinds' of just selecting loads of edges and faces. On the Left image, the biggest problem was the bits on the top which is where the lights will go. Cutting the hole in the middle was difficult to do but I did complete it. I still need to do a few more things to the model like add a plane for the lights and may also do a wire as well. The Middle image is the unwrap for the light. It is also quite complex so might not be textured in photoshop. The Right image is of the spotlight fully completed. I did decide to do it in photoshop because it was not that bad. Some of the small details I did not do in photoshop however like the screws and handle. For these I just used 3DS Max colours. The textures have made this look so much better.
Camera Asset:


This is my Camera Asset. Out of the last 5, I would say this was one of the more enjoyable ones to make. The Left image shows just the base model without much detail or colour. The Shape of the camera was a weird one so I had to tesselate a cube to be able to manipulate the different angles etc. The end of the lens was the most difficult part. I had to move a lot of the vertices around to capture that unique shape to It and also make it look natural. The middle Image is the unwrap for the camera. It is by far the most complex unwrap and I will most likely not use photoshop for this one. The Right image is of the completed camera asset. I did manage to do it in photoshop however it was a lot of hassle. First I had to find a way to properly unwrap some of the poly's, especially the front of the lens. I also then Joined some together and finally, I only textured the ones that are seen on the outside of the camera. Overall I'm happy with it but I feel I could have added more details like buttons and writing if I had more time.
Briefcase Asset:


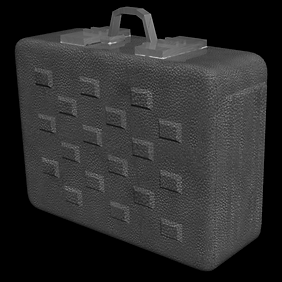
This is my Briefcase Model. This model marks 2/3 of the way through the modelling which means I have nearly Finished it. The Left image is (like the others) just the plain model. If I would do something to improve it, it would be making the handle bigger because it is out of proportion compared the the rest of the case. The Middle image is the Unwrap for the briefcase it is ready for photoshop. The image on the Right is of the completed asset. I added a leather texture
Ash Tray Asset:


This is my Ash Tray Asset. It is one of the more simple ones I will be making and didn't take very long to make at all. On the Left I have decided to colour it with default 3DS Max colours so you can see that the read is the tray and the brown are the cigarettes. This asset is just a little something to add that detail and could possibly be used in the investigation. The Middle image for this model is the unwrap. It is also quite simple so it is ready for photoshop. The Right image is the completed asset. I decided to only texture the cigarettes as they obviously needed doing but also the tray itself looks alright with the colour I gave it on 3DS Max anyway. I think it looks alright and considering it will only be a small detail it is not on my priority list.
Vase Asset:


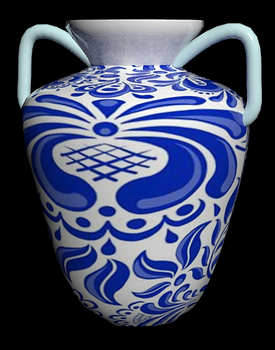
My Penultimate model is a Vase. It will act as both decoration and also a possible clue. The left image is of just the model. To complete it I learned how to use both the Lathe and Shell modifiers in 3DS Max both tools will be very handy when making unique shapes like these. The Handles are just lines. The Middle image is the unwrap for the model. It is very simple so I will use Photoshop. The Right image is the completed Vase asset. It was a lot more difficult to unwrap than I originally anticipated. I, with some help, find a way that allowed me to have a more simple unwrap than the overlapping one you see above. I'm not sure about the handles. I used just a 3DS Max colour so I may change that before I had it to the level.

ID Badge Asset:

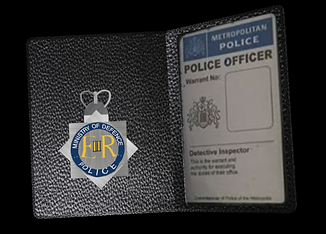
My Final Asset is another simple one and that is a Police ID Badge. It will be laying on maybe the coffee table to give some context. The Left Image is quite blank because it is going to need Textures for the actual ID and lettering. I did however make a badge that does look quite cool I think. The Middle image is of the unwrap it is ready for Photoshop. The Right image is the final screenshot of my assets. The ID Badge is look quite nice It was quite simple to texture which is handy as it gives me more time to do other things. The Badge image is quite wonky because the unwrap wasn't the best quality, If it were a more important asset I would have spent more time fixing this but it isn't so its ok. Now all my assets are complete I now need to start working on the actual level.
Level Progress:
Disclaimer: Due to the 2 weeks I have left on this project I have decided not to create my level in Unreal Engine. This is because I will not have enough time to make it as I do not know it as well as 3DS Max. Instead I am going to do it in 3DS Max. Also, the fact that My scene is entirely interior means it makes more sense to not use Unreal (which is good for exterior levels). This decision shouldn't affect the final result. However I can import it into unreal for ease and interactivity.
Part 1: The Room

This is my first progress screenshot for my level. As I have done it in 3DS Max it has been quite simple to make. I started with a Floor which is an Extruded Plane. I then created the walls using boxes. For the arch I used a new tool to me called the Boolean. This is an extremely useful tool to now be able to use. It allows you to cut out a specific shape that you overlap it. I used a cylinder for the arch and a small box for the window. The door is just a gap between two boxes with a crossbar over it. This floor design is a direct representation of my floorplan I had made in the Pre Production Section but a smaller part of this. The smaller design is a lot more practical and makes more sense as I am running out of time. Next I will probably Start to detail the room and begin importing assets.
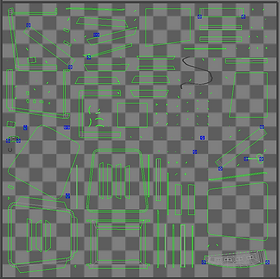
This image is of the first UVW Unwrap for the room. As you may be able to see it looks quite overwhelming because of all the rectangles and squares dotted about the place. I will need to update this so it is easier to texture. To do this I can remove any and all shapes that the player will not see. I can also make the sides clearer to decipher.


This is a screenshot of the Unwrap Render that will be exported to photoshop to be texture. As the last update says, I did change up the Unwrap. First I made the different sides of the room connect to make it clearer to see what is what. I then collected all the shapes that are on the outside of the room that no one will see. I then minimized these so I know not to bother texturing them. Now I need to find appropriate textures and apply them to the right shapes in order to complete the room.
This is a WIP of the room with textures. I still need to do some things light make the walls less shiny. I thought showing it at this stage would be a good idea.

Part 2: Importing to Unreal

This is an image of the room after it has been imported to unreal. I have also added all of the downloaded assets so it looks better. They have all been downloaded from a website called 'Turbosquid' and are all 3ds Max files. They were not too difficult however some where not textured correctly so I had to do that quite quickly using the Unreal material editor. Now I have to add the assets that I have created and then I will be near Completion.
This is a WIP of my room at the moment. All the assets have now successfully been implemented into the level however alot of my assets do not have the correct textures so I will now have to fix this.

Part 3: Finishing Touches

This room is nearly complete. I have corrected all the textures and added some lighting. It is at this point that I am able to finish. However I still want to add a couple small features like pictures and police cordons. I have done the lighting, this didn't take too long but it was just a bit of playing around with the different settings for the lighting. So now I have just got to finish the room up and then I will be 100% done in practical.
This is the completed level. There were a few things I would have wanted to add if I had more time. This is one of a couple high resolution screenshots I will include in the Final Product section. The full description for it will also be in this section.

End Of Production:
Now that production has come to a close it is now time to move on to the final stage of this project, The Evaluation. This will allow me to reflect on what I have done during this project and how I could improve in the future.